A Simple DIY Guide to Installing Glass Fireplace Doors
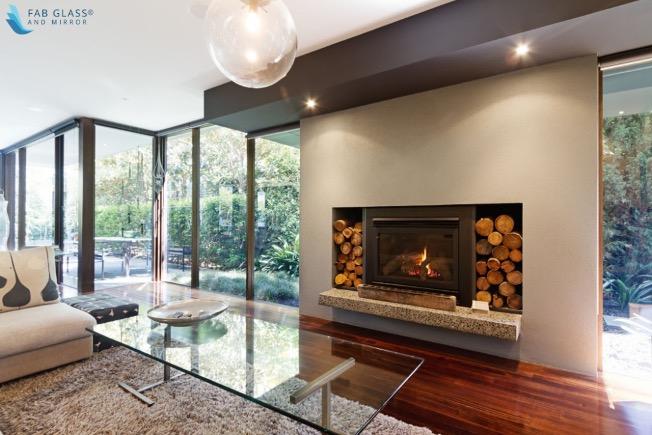
The joy of lit and warm fireplace on a shivery night is a pure delight. However, when you have to wait for it to run out before hitting the sack, it tends to lose its charm entirely. After all, you possibly can't leave fire-woods unmanaged; the only way around is to shut it off with glass Fireplace doors and call it a night.
Most of the contemporary fire pits arrangements come along with the glass doors. But if you wish to incorporate an additional security feature to the existing set-up, it's not that complicated to retrofit it — The custom glass fireplace doors are available in conventional sizes that can easily slip into the doorway of any flat firebox. You might find this solution can save you money.
Tools and Materials required for installing Glass fireplace doors
It can be a little tricky to assemble and install a glass fireplace box kit yourself, and the task is accomplished faster with two men in action. However, that doesn't imply in any way that a novice can't do it! Though it might take a little longer, but certainly not forever. So, if you are reading this before getting your kit, bear in mind that everything will get so much easier to comprehend once you've got the fireplace doors in hand and you can see what you're dealing with.
Here is the list of contents that you may receive inside the new glass door kit.
- Lintel clamps for the top
- Floor brackets for the bottom
- Screws
Other tools that you'll require during the process:
- Pliers
- Safety gloves
- Torchlight
- Drill machine
- Wrench and sockets
- Hammer
Installation Steps
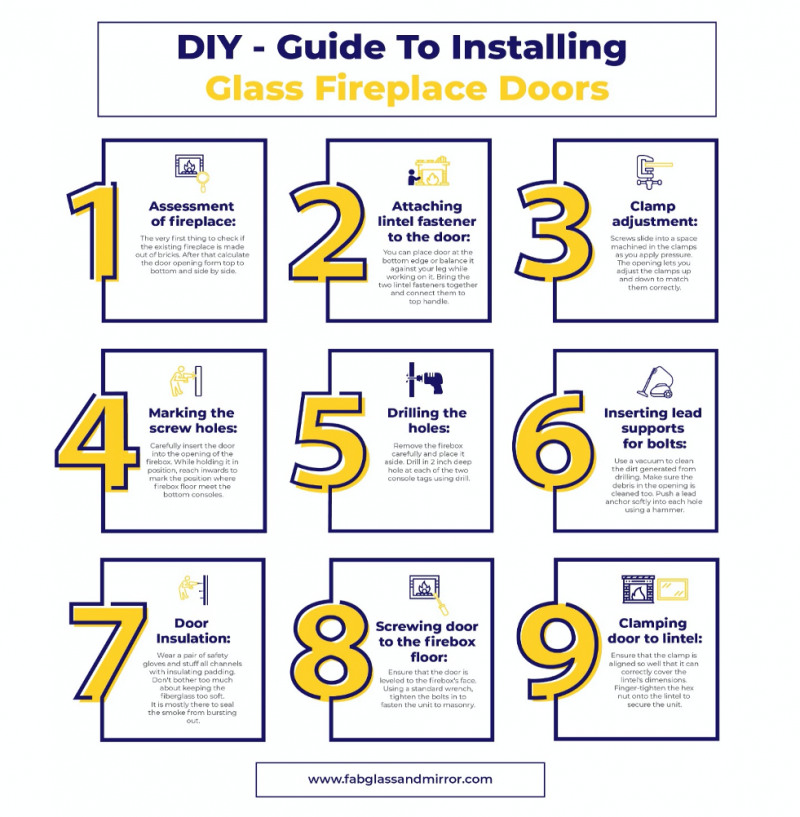
Step 1: Assessment of Glass Fireplace Doors
The very first thing you should consider before you decide to buy a kit is the existing fireplace framework at your residence. If it is made out of conventional bricks, a DIY fireplace door construction shouldn't be a matter of concern unless of course, the used bricks are incredibly old or fragile. However, in case your structure is built out of materials such as mortar or field stones, you must consult a specialist before proceeding further.
After you have confirmed that your current fireplace set-up can handle an additional bolted frame, the next stage is to calculate the opening of the firebox from the top (the lintel) down (the core) and side by side. Most wood burners are designed with a rim joist bar to which the fireplace doors can be easily fastened. However, in the rare situations where there is no bar, the doors must be fixed straight to the brickwork.
Step 2: Attaching lintel fasteners to door
You may either position the door at its bottom edge or balance it against your legs while working on it; or, you can also simply let your helper hold it in place for you. Lift the four bolts mounted at the back of the door with the help of a suitable screwdriver, where the floor panels (bottom) and lintel fasteners (top) will go. Keep them aside; you'll later want them to strap the clamps and brackets.
Bring the two lintel fasteners together, and connect them to the top handle.
Step 3: Clamp adjustment
Remember that the screws slide into a space machined in the clamps as you apply pressure that binds the lintel fasteners to the upper, rear door frames. This opening lets you manage the clamps by adjusting them up or down to match them correctly with the lintel's underneath, which runs around the edge of the firebox doorway.
Start by pushing the two L-shaped ground brackets up at the door's bottom.
Step 4: Marking for screw holes
Cautiously insert the door into the opening of the firebox, ensuring that its finish doesn’t get damaged or scratched. Neatly match the module to the doorway— You could make use of hanging torchlight to keep the place lit while you are working.
While trying to hold the unit in position, reach inwards to tag the placement where the firebox floor meets the bottom consoles. By making use of thick marker such as Sharpie, mark the brackets through the grooves.
Step 5: Drilling holes
Remove the firebox door carefully, and place it aside. Drill in a 2-inch-deep hole at each of the two console tags using an electronic driver fitted with a 5/16-inch bit.
Step 6: Inserting lead support for bolts
Use a vacuuming device to collect the dirt generated from drilling the holes. Make sure the debris in the openings is vacuum-cleaned too. Push a lead anchor softly into each hole using a hammer, until it is flush with the surface of the encircling bricks.
Step 7: Door Insulation
Wear a pair of safety gloves and unroll the insulating fibreglass that ships with the fireplace doors. Break off bits on both sides and from the top of the module, enabling it to fit into the streams.
Stuff all three channels with insulating padding. Don't bother much about keeping the fibreglass soft, as you would otherwise do in case of wall insulation — it's mostly there to seal the fireplace doors to prevent smoke from bursting out, and shielding them to avoid any heat-induced damage to the finishing.
Step 8: Screwing door to the firebox floor
Glide the door cautiously into the opening of the firebox. Check that there is no insulation stuck around the frame rims.
Also, ensure that the door is levelled to the firebox's face. Move further in and rotate sheet-metal fasteners through the base brackets, right into the lead support.
Utilizing a standard wrench, tighten the bolts in to fasten the unit to the masonry.
Step 9: Clamping door to lintel
The flanges at the top of the firebox which hold the fireplace doors to the lintel bar are adjustable. Ensure that the clamp is aligned so well that it can correctly cover the lintel's dimensions.
Finger-tighten the hex nut onto the lintel to secure the unit. Take help of pliers when you can't move the nut any further— it will give another quarter turn for better clamping.
Estimated time and cost of installing a glass fireplace door at home
DIY glass fireplace doors are easy to install and won't take more than 2 hours to install— even for a person having zero skill level. With expertise and little help, you can accomplish the task in half time too.
Depending upon the glass quality, functionality, and the dimensions of the fireplace structure, the DIY installation kit may cost you anywhere in the range of $300 to $1,500.
More to Read:


Previous Posts: